
Tips to make great Pokémon Perler bead art
Pixel art has long been the style of choice for Pokémon fans, as the chunky, low-resolution look evokes nostalgia of the early days of the series on Game Boy. The style requires years of practice, but it is also an art form. It’s easy to recreate similar designs using Perler beads.
Perler beads are the cylindrical plastic beads in a variety of colors that fit perfectly onto wooden boards. Because of the layout and the low-resolution look, they’re the perfect tool to recreate pixel art. As a person who would describe herself as “craft inept,” this is one of the few remotely artistic things I can do.
For Polygon Summer Camp, I made a quick and easy guide to designing Pokémon Perler bead art and coasters.
:format(webp):no_upscale()/cdn.vox-cdn.com/uploads/chorus_asset/file/23649585/ana_diaz_220623_ecl1072_0001.png)
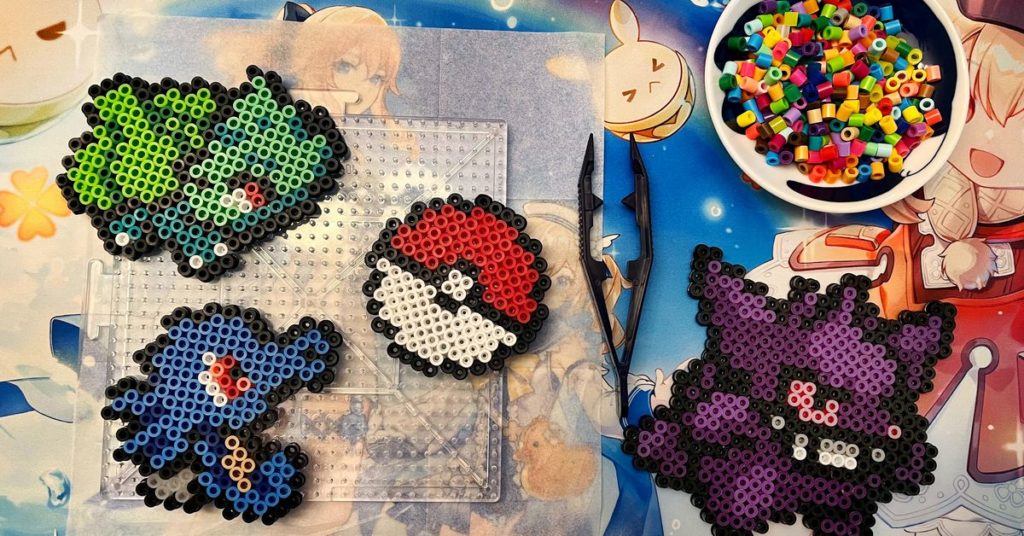
Photo by Ana Diaz/Polygon
:format(webp):no_upscale()/cdn.vox-cdn.com/uploads/chorus_asset/file/23649592/ana_diaz_220623_ecl1072_0002.png)
Photo by Ana Diaz/Polygon
:format(webp):no_upscale()/cdn.vox-cdn.com/uploads/chorus_asset/file/23649596/ana_diaz_220623_ecl1072_0003.png)
Photo by Ana Diaz/Polygon
:format(webp):no_upscale()/cdn.vox-cdn.com/uploads/chorus_asset/file/23649600/ana_diaz_220623_ecl1072_0004.png)
Photo by Ana Diaz/Polygon
Materials required
- Perler beads: I have a variety pack of 22,000, because I wasn’t sure what Pokémon I wanted to make at first. You get so many different shades. (It can also be helpful to get a pack of black beads since they’re so commonly used.)
- Parchment paper or Perler bead paper (they’re basically the same; some beads come with the paper included)
- Perler bead board
- Perler bead-tweezers: These can be considered optional. You don’t need a tweezer if you have several people involved. These are only useful for precise placements.
- An iron
Step 1: Choose your Pokémon
The beauty of Pokémon Perler bead creations is you can create any Pokémon by just looking at the pixel art and recreating it dot by dot. (That’s how I made Gengar.) However, if you’re a beginner I suggest using a pattern online. To find one, just Google a Pokémon, then add the term “perler bead.” There are also YouTube videos that show designs and are easy to follow. Based on what beads you already have, you can choose an easy design.
Before you begin: Be sure to choose a design that will fit on the board. Your design’s size will never shrink. Because of chunky pixels, something that appears smaller will actually end up looking larger. To ensure your design fits on your board, make sure to count the longest and widest dimensions.
If you want to make a coaster like Gengar, I suggest picking a bigger, rounder Pokémon. More chonk is better. As you can see below, you can also make Poké Balls that serve nicely as coasters because of their shape.
Step 2: Set up your workspace
:format(webp):no_upscale()/cdn.vox-cdn.com/uploads/chorus_asset/file/23649651/IMG_2266.jpg)
Photo by Ana Diaz/Polygon
For the craft to go quickly, you’ll want to do the more tedious organizational work beforehand. You should sort your colors before you start. For color separation, I use small bowls. It’s like the mise en place of Perler beads!
Step 3: Place the beads on the board
:format(webp):no_upscale()/cdn.vox-cdn.com/uploads/chorus_asset/file/23649661/IMG_2271.jpg)
Photo by Ana Diaz/Polygon
All you have to do next is recreate the pattern or pixel art you’re mimicking with a one-to-one ratio and place the beads on the board. Not only is it easy to bump and scatter beads but it’s also difficult to match colors properly. Some Pokémon colors can be hard to nail because you’ll spend a lot of time wondering what version of purply-pink or pinkish-purple will look best for something like Ditto.
That’s why I suggest trying to pick roughly similar colors and then laying them out on the board to see if they look good on the character. I often choose to go between Step 3 & Step 2 as I realize that something is not right after looking at it on the board.
Some prefer to outline the area and fill in the middle. I don’t like this because it can be harder to lay beads within a border, but play around with it and see what works for you.
Step 4: Iron your beads
:format(webp):no_upscale()/cdn.vox-cdn.com/uploads/chorus_asset/file/23649669/IMG_2320.jpg)
This is the best part. After plugging in the iron, heat it up on high. You should not rub the beads. The iron can be used to gently press onto the design. After that, you can iron the beads using circular movements for around 20 seconds. You’ll know it’s starting to melt when you see the design melt through the paper, so you’ll want to keep going until you see the backs of the beads melt together.
There is a sweet spot of the beads blending into each other on the border, but you don’t want too many of the beads’ middle holes to fill up. If you iron for too long, you can also ruin the board you’re using. Make sure to iron all pieces of your design.
Step 5: Enjoy your design
After that, wait for the design to cool down before peeling it off. Once cooled, it’s completely solidified and you’re good to use it for whatever you want. Although some may choose to use them as decorative items, I highly recommend using them as coasters.
#Tips #great #Pokémon #Perler #bead #art


