
Make your own Spy x Family arts and crafts projects with this DIY guide
You are ready to rock this cosplay season! The mission of your cosplay team: Create some truly sneaky Spy x FamilyYou can make cosplay costumes from everyday objects, paper pieces, and crafting supplies. Don’t worry, you don’t need to have psychic powers to follow along with these simple craft projects, as every item has step-by-step instructions, recommendations, and tips to take you from start to finish.
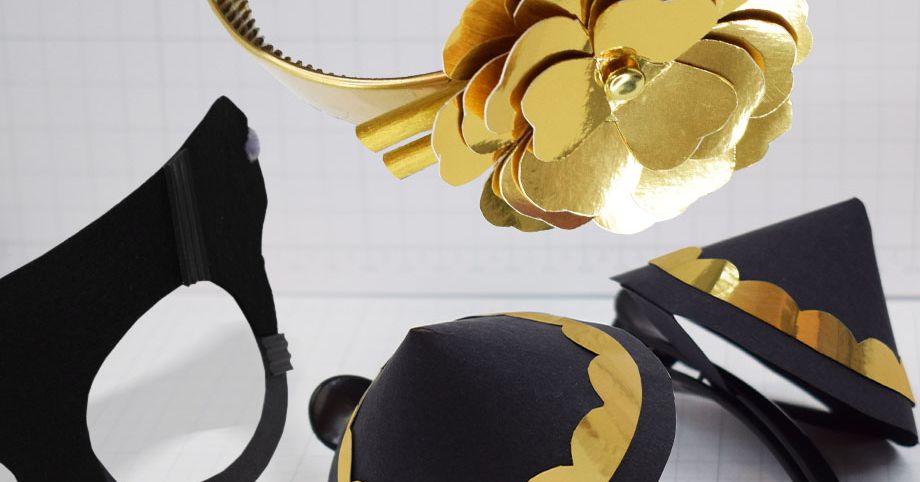
Anya’s hair clips
:format(webp):no_upscale()/cdn.vox-cdn.com/uploads/chorus_asset/file/23626171/Spy_X_Family___Anya_Hair_Clips___Final_Outcome.jpg)
Let’s start by making a pair of Anya’s iconic hair clips. They won’t let you read minds, but you won’t need to, because you already know everyone you see will be thinking, “Wow, what cool head cones.”
Supply recommendationsYou will need a couple of hair clips, black craft papers, gold paint, foil card or glue, scissors and access to the printer.
Step 1Here is the printable template. There’s a pre-textured version of the template that you can print out, build, and wear immediately. You can also print the blank template to make your own craft projects.
Step 2 Take the template, and then cut the cone pieces along the solid-black lines.
:format(webp):no_upscale()/cdn.vox-cdn.com/uploads/chorus_asset/file/23626173/Spy_X_Family___Anya_Hair_Clips___Image_1.jpg)
To add depth and detail, I first printed the template on black cardstock. Then, I printed it again on white cardstock.
:format(webp):no_upscale()/cdn.vox-cdn.com/uploads/chorus_asset/file/23626174/Spy_X_Family___Anya_Hair_Clips___Image_2.jpg)
Step 3Before gluing, turn the cone upside down and align it with the dot line. For a brace look, you can fold both strips and glue them to the underside. If you’ve made a separate golden section, glue it onto the cone as shown.
:format(webp):no_upscale()/cdn.vox-cdn.com/uploads/chorus_asset/file/23626175/Spy_X_Family___Anya_Hair_Clips___Image_3.jpg)
Step 4 You can attach the cones with a hair clip. This can be done by placing the clip on the shorter section of your brace, or using glue. A smaller set of clips will give you a more accurate anime style. I’ve used very large clips in the image below because I don’t want them to fall out as I’m perusing the bargain manga boxes on the con floor.
:format(webp):no_upscale()/cdn.vox-cdn.com/uploads/chorus_asset/file/23626176/Spy_X_Family___Anya_Hair_Clips___Image_4.jpg)
Yor’s headband
:format(webp):no_upscale()/cdn.vox-cdn.com/uploads/chorus_asset/file/23626177/Spy_X_Family___Yor_Headband___Final_Outcome.jpg)
If you’re looking for a more challenging craft project and have the patience to wait and watch paint dry, you can put together your own Yor-style headband.
Supply recommendationsA vintage hairband with a gold foil card or gold paint. Also, bendy wire.
Step 1Golden your hairband. To achieve a smooth and uniform coating on my hairband, I used a chrome-gold spray paint. Acrylic paint is also possible. The slippery nature of plastic hair bands can make it difficult to paint. You can try sanding the hairband with a roughgrit to remove any traces of the slippery surface. It will increase the likelihood that the paint will stick.
:format(webp):no_upscale()/cdn.vox-cdn.com/uploads/chorus_asset/file/23626179/Spy_X_Family___Yor_Headband___Image_2.jpg)
If you’re planning to spray paint your headband, make sure you do it in a well-ventilated area and surrounded by things you don’t mind getting potentially splattered with paint. I used to do it in my back yard, with two garbage bags and a milk carton on top. It’s not a pretty setup, but it meant I could get the job done without ruining anything unintentionally.
Step 2Here is the template for the flower. You can print it on strong, printer-friendly cardstock. After printing the template, cut the petals using the black outline.
Step 3As shown, trace around cut parts of flowers with a pencil placed on the back side of a gold foil-coated paper.
:format(webp):no_upscale()/cdn.vox-cdn.com/uploads/chorus_asset/file/23626180/Spy_X_Family___Yor_Headband___Image_3.jpg)
Step 4Fold the flowers inwardly towards the middle of the foil-covered pieces. To make sure your headband looks great from all angles you can paint each piece of flower with gold paint.
:format(webp):no_upscale()/cdn.vox-cdn.com/uploads/chorus_asset/file/23626181/Spy_X_Family___Yor_Headband___Image_4.jpg)
Step 5You can combine the pieces of the flower by gently pushing a pin through each one. Then, go from the smallest to the largest.
:format(webp):no_upscale()/cdn.vox-cdn.com/uploads/chorus_asset/file/23626187/Spy_X_Family___Yor_Headband___Image_5.jpg)
Step 6You can cut two chopsticks to the length you prefer and paint them gold.
:format(webp):no_upscale()/cdn.vox-cdn.com/uploads/chorus_asset/file/23626188/Spy_X_Family___Yor_Headband___Image_6.jpg)
A waxy coating is often applied to disposable wooden chopsticks. Although it is difficult for paint to adhere to these chopsticks with light sanding, this can be done. I found that the first coat of paint didn’t stick to the chopsticks very well, but a second coat stuck a lot better and gave a great result.
Step 7 Turn the end of the split pin into a tight, circular motion and then insert the chopsticks inside the metal loop. Hot glue can be used to make sure the chopsticks remain in place at the length you prefer.
:format(webp):no_upscale()/cdn.vox-cdn.com/uploads/chorus_asset/file/23626189/Spy_X_Family___Yor_Headband___Image_7.jpg)
Step 8 Two sets of benty wire are required to attach the flower arrangement to your hairband. Headbands are usually equipped with notches inside that will hold the flower assembly in place. Be sure to trim excess wire from the headband and gently bend it towards your scalp.
:format(webp):no_upscale()/cdn.vox-cdn.com/uploads/chorus_asset/file/23626190/Spy_X_Family___Yor_Headband___Image_8.jpg)
To complete the Yor look, repeat these steps and attach another flower to it. If you’re worried about turning your head too quickly and jabbing another convention attendee in the eye with a set of chopsticks, consider substituting them for foam elements or cardboard. Safety is the most important thing. No one’s going to be eyeing up your crafty cosplay if they’re all too scared of getting their eyes poked out to take a closer look.
Loidman mask
:format(webp):no_upscale()/cdn.vox-cdn.com/uploads/chorus_asset/file/23626230/Spy_X_Family___Lloyd_Mask___Final_Outcome.jpg)
If you’re looking to take your Loid cosplay to the next level, and reference a specific part of the anime, why not make your very own “Loidman” mask?
Supply recommendationsYou will need black card, black felt and foam strips. Also, you’ll need string, pipe cleaners or glue.
Step 1 Download the Loidman Mask Template here. There are two versions of the template included; one is pre-textured and ready to go as soon as it’s cut out and glued together, and the other is a blank version, which means you can color it in yourself.
Everyone’s head is a slightly different size, so there is no “one size fits all” template. You can print the blank version on regular printer paper, and then cut out the eye holes so you can check the fit of the template to your face. Most printing programs allow you to scale the image up or down depending on if it’s too big (scale down) or too small (scale up).
Step 2Cut both the templates along the solid lines (red for the pre-textured template and black for the blank).
:format(webp):no_upscale()/cdn.vox-cdn.com/uploads/chorus_asset/file/23626273/Spy_X_Family___Lloyd_Mask___Image_1.jpg)
Step 3 The key is shown below. Fold your nose along the lines.
:format(webp):no_upscale()/cdn.vox-cdn.com/uploads/chorus_asset/file/23626274/Spy_X_Family___Lloyd_Mask___Image_2.jpg)
Step 4 The nose should be glued to the eye.
:format(webp):no_upscale()/cdn.vox-cdn.com/uploads/chorus_asset/file/23626276/Spy_X_Family___Lloyd_Mask___Image_3.jpg)
Step 5You can attach the sides together with pipe cleaners or string. To ensure that the mask fits properly, push or pull the pipe/string through the holes in the mask. Then tie the strings or pipes at your back.
:format(webp):no_upscale()/cdn.vox-cdn.com/uploads/chorus_asset/file/23626279/Spy_X_Family___Lloyd_Mask___Image_5.jpg)
Optional step 6 You can make your mask more detailed and richer by adding extra elements. The template was glued to black felt, and accents were added using strips foam for a classic comic-hero appearance.
:format(webp):no_upscale()/cdn.vox-cdn.com/uploads/chorus_asset/file/23626282/Spy_X_Family___Lloyd_Mask___Image_6.jpg)
These are, hopefully. Spy x FamilyIf arts and crafts have inspired you, grab some PVA glue to start gluing your projects together. Remember, you’re making crafts, not fine art; any imperfections or mistakes you make along the way will only add to the unique charm of your handmade cosplay components. Enjoy your crafting endeavors!
#Spy #Family #arts #crafts #projects #DIY #guide


